Repair to glass at top of mast tube

diver864

New Member
Hi, recently I bought an old 1975 Sunfish. Always been a big-boat sailor, didn't know anything about Sunfish, but now I have kids and wanted to give them a gentle and wet (aka fun) introduction to sailing... Anyway, I didn't know what to look for or look very closely. The boat is sailable but has some leaks. I've found the threads on those and will have fun addressing over the winter. Drying her out now.

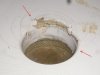
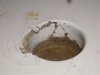
But I am concerned about a break in the glass, involving about half the rim of the mast tube. Essentially, the gelcoat is broken away and the glass roving beneath is also broken clean through, right where the deck and collar of the tube meet. Doesn't flex and doesn't appear delaminated badly, thank goodness. I just don't know how to fix this kind of break, I'm pretty handy but have no experience with fiberglass work yet.

Does anybody have any experience with fixing this? It seems it will be a bit more involved than your run of the mill fix for a gouge in the topsides...

Thanks! This forum is an incredible resource!
 
Tricky repair. If you're not experienced in fiberglass, I'd say instead of a cut out-bevel-patch on the outside go with building up new fiberglass layers of roving from the inside of the hull. That way your boat will not look like it has such a rough looking repair. You'll need to cut an inspection port in front of the mast. Would be a good idea to repair it before sailing as it's in a high stress spot. Going to have to wait till the boat is dried out before starting. Post some pictures if you can.
 
Since there haven't been many responses, I will try to add a little.
However, I have never done this repair; therefore, take my advice with caution.

Webfoot has pointed you in the right direction. I also think that you should put in a port so you can reach the damaged area. The flange (coupling?) between the deck and the mast tube appears to be (partially?) broken and you will need to wrap a few layers of glass cloth (impregnated with epoxy) around the damaged area. Of course, you will need to tidy up that area first and dry it out thoroughly. Wipe it down with acetone before glassing.

Laser folks repair the mast tube, when broken away from the bottom of the hull, like that.

In addition, you could apply MarineTex or West Systems epoxy to the inside of the tube to further strengthen the mast tube deck joint, after the glass repair.

I believe that this writeup is similar to Webfoot's recommendation.
 
Re: Repair to glass at top of mast tube - PICS

Hi webfoot and wavedancer,

many thanks for your responses. Have been away for a few days, and my camera even longer. Here is a photo of the damaged mast tube. Arrows show extent of damage to the glass, as far as I can tell without grinding away the gelcoat. Good news is there is already a 6" inspection port forward of the mast tube...

[Edited]Here is another angle on the mast tube. Tried to take pics of the deck/tube joint from underneath but the previous repair there (thus the port) is just a mass of brown repair material obscuring everything (epoxy...) Hey, that reminds me the owner told me of this. Don't know if he glassed it though.

Just for fun, I've also posted a shot of the other 'tricky' repair I'm going to have to make, the forward end of the daggerboard trunk. :eek: 
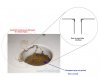
That crack was repaired before by someone else but you can see at the red arrows where it has cracked again...

Internal glass is dried out now, and the forward block of styrofoam (which I can touch through the inspection port) is getting dryer but still dampish to the touch, so I assume it all is.

Other damage appears to be cosmetic/gelcoat. No apparent blisters or soft spots.

Any new thoughts?
 
Did the previous repairs break, or just further damage to the original material? I'm thinking that, since you said there doesn't appear to be any flex, that the previous repairs to the mast hole may be structurally adequate, though perhaps not waterproof or attractive. Maybe now the thing to do, at least at the mast hole, is repair from the top. The daggerboard trunk does sound like it needs underneath repair/structural enhancement. Good luck, you have some work ahead of you, but it is amazing what can be fixed and how good it can be made to look.
 
I can't really tell if the previous repair is adequate or not. I can't see if any glass mat was applied in there, it's just a thickish (1/4") mess of hard, opaque brownish stuff (resin or epoxy presumably, but with some additive) slapped all around the tube and juncture with the deck. The guy I bought it from said he made the repair, and showed me other external fiberglass repairs he did make, which I can see were with clear(now yellowed) resin or epoxy and some mat. You can see a bit of it on the deck near the hole in the photo below. Doesn't look the same as the stuff on the inside.

Not sure if my pics are visible to you so I've uploaded them as attachments this time. You can see that about 1/3 of the fiberglass structure of the deck-part of the tube (exposed where the gelcoat is completely gone) is broken clean through, right at the point where the deck turns downward to flange over the top of the tube. Below that turn, a piece of the gelcoat appears to be separated from the glass and could be lifted/broken off.

For starters I think I am going to have to chip or grind away at the stuff underneath, try to get a surface to which resin-soaked glass will adhere, and just build it up from the inside. However even if it's adequately repaired structurally from below, I've somehow got to fill the gap where the fiberglass is broken, sealing it off. Either by cutting it out and reglassing (but how do you do that at a 90-degree round flange and keep the hole smooth for the mast?) or by filling it with something. I want it to be watertight.

I also believe the bottom of the tube is water-permeable, so I've got to fix that, too. Help!

I care less about how it looks, because I intend to paint the boat when I'm finished. There have been too many gelcoat cracks and especially yellowed resin or epoxy repairs to just try to restore the gelcoat.

Thoughts?

PS "OldNSlow" I like that!
 

Attachments

  • mast hole.jpg
    mast hole.jpg
    67.4 KB · Views: 48
  • mast hole 2.jpg
    mast hole 2.jpg
    338.8 KB · Views: 53
Well, you are going to finish with what will become you're best friend. Epoxy and Micro-Balloons. But that's the near the end to the story. You have to get all that brown gunk cleaned away from the mast tube/deck before you start. Your repair underneath will become the backing for working on the outside.

Get the gunk cleaned away so you have a good surface to adhear the fiberglass to. Treat the repair as a broken out mast tube but first, build up layers of woven roving and mat around the mast tube. Should encircle the mast tube 360 degrees and extend outward as far as possible. Sort of like a large patch with a hole in the center.

After first layer, apply strips of fiberglass in Scotch tape like fashion attaching tube to deck. Cover with another layer of roving/mat.

After repair is dry flip boat upright. Grind away broken fiberglass without grinding into repair. Could use Epoxy and Micro-Balloons or Marine Tex at this point. Because Marine Tex is a epoxy putty, you can shape the repair before it dries. The problem is Marine Tex is very hard to sand without damaging the gel coat around it.

Epoxy Micro-Balloons sands like a dream but will run downhill. Would need to build up a tape dam around the hole. It would be my choice.

Option three is building up fiberglass on the outside. Would need one layer of mat and one layer of fiberglass. Maybe the best way since this would be resistant to cracking. Fiberglass works around corners well. You could try it and if it did not work, pull it off before dry and go with option one or two.

Bottom is same way, 360 degrees of Scotch Tape fiberglass strips, cover with mat and roving.

Be very carefull not to get epoxy in the mast tube or mast will not fit.

Anywho, that's how I would do it, others will have maybe better methods. Just go slow and enjoy the ride, there are always a few setbacks along the way.
 
The concentric fractures in the gelcoat are an indication this area has suffered a heavy impact. Probably something to do with the mast being in place while the whole boat got thrown down the beach in a squall, turtled in the shallows … stuck in the mud … then wrenched sideways by an assisting motorboat, turtled in the waves and hammered into the bottom, heck, even rigged on it’s trailer in the driveway and blown over by a stiff gust of wind. Something along those lines, anyway.

On the deck side the repair needs to chip back / sand back the gelcoat in the area defined by the entire concentric pattern, plus some. The underlying fiberglass needs to be inspected, searching for cracks that run into and break through the fabric/resin layers. If deeper cracks are found those layers need to be sanded down and the repair then takes on the structural reinforcement needs of a hole rather than the superficial replacement of the cosmetic gelcoat layer.

At the mast tube flange, the ideal approach would be to wrap structural layers of fabric and resin around the tube from inside the hull. That would leave the outside as simply small hole and crack repair topped of with cosmetics. The glob-job repair done previously complicates things. I think I’d see if the mass will peel away with a little prying by a putty knife. Maybe there wasn’t much prep done and the bond is weak. Failing that, it might be necessary to sand back the mass to a point where fabric can be laid down to reconstruct the tube where it sheared at the deck flange.

All the pointers so far appear to be pretty sound, but IMHO they are just bits and pieces of the more in-depth preparation and step-by-step guidance you can find in a good fiberglass repair book. My recommendation is to find a book that you like and use it to plan your repair start to finish. I think you’ll find by doing this what may look like a big job now will be more manageable broken down into logical phases.

My choice of resin for this job would be epoxy. You don’t know what was used before and epoxy will adhere best to most anything residual so your job doesn’t become compromised by an unknown.

Educate yourself on the types of glass fabrics and resin additives, each one has its specific use for maintaining the integrity of your work. For example, adding colloidal silica to a resin thickens it to help keep it from sagging in non-horizontal locations. It also makes the resin harder and more brittle. Glass fibers add rebar-like strength without sacrificing flexibility allowing a repair to move with the area it’s adhered to without cracking. Talc, sawdust, glass beads, even bread flour are all used to fluff resin making it a cosmetic fairing putty easy to sand. Use all these tpes in their intended way and your repair will stand up to many years of use.

Look around your area for a specialty plastics dealer. Resin suppliers are invaluable for helping you select the proper materials and providing tips on their use. Something a big-box hardware can’t even approach. It’s also nice to be able to buy pieces of fabric, not whole bolts…, and ounces of filler, not pounds.

If such stores are unfamiliar, here’s an example of one near my workshop.
https://www.plasticareinc.com

…and another one on-line who’s got a good inventory.
http://www.fiberglasssupply.com
 

Attachments

  • mast hole 202b.jpg
    mast hole 202b.jpg
    48.9 KB · Views: 51

Back
Top